
使用 playwright-smart-reporter 打造智能、带AI分析的测试报告
· 1,136 词 · 6 分钟 读完 playwright基础 原创 测试报告 AI
playwright-smart-reporter 是一个专为 Playwright 测试框架打造的智能 HTML 报告工具。
它比 Playwright 自带的 HTML reporter 更现代化、更智能,主要目标是帮助团队更快定位问题、减少调试时间、提升测试稳定性。
仓库地址(持续更新):
https://github.com/qa-gary-parker/playwright-smart-reporter
项目支持python和javascript,我们先拿js版本来体验一下。
第一步:安装
# Node.js 项目(最常用方式)
npm install -D playwright-smart-reporter

# 如果你使用 Python + pytest-playwright
pip install playwright-smart-reporter-python
# (Python 版文档请看仓库 python/README.md,本教程主要讲 JS/TS 版)
第二步:最简配置(3分钟上手)
在 playwright.config.ts / .js 中添加 reporter:
import { defineConfig } from "@playwright/test";

export default defineConfig({
  // ... 其他配置 ...

  reporter: [
    [
      "playwright-smart-reporter",
      {
        outputFile: "playwright-report/smart-report.html", // 建议放在报告目录
        historyFile: "playwright-report/test-history.json", // 很重要!用于历史趋势、flaky检测
        maxHistoryRuns: 12, // 保留最近12次运行的历史
      },
    ],

    // 你可以同时保留官方的html reporter(可选)
    ["html", { outputFolder: "playwright-report", open: "never" }],
  ],

  // 强烈建议开启 trace(很多高级功能依赖它)
  use: {
    trace: "retain-on-failure", // 或 'on' 如果你想每个测试都保留
    // screenshot: 'only-on-failure',  // 配合使用效果更好
  },
});
运行测试:
npx playwright test
结束后打开生成的报告:
npx playwright show-report playwright-report/smart-report.html
# 或者直接浏览器打开文件
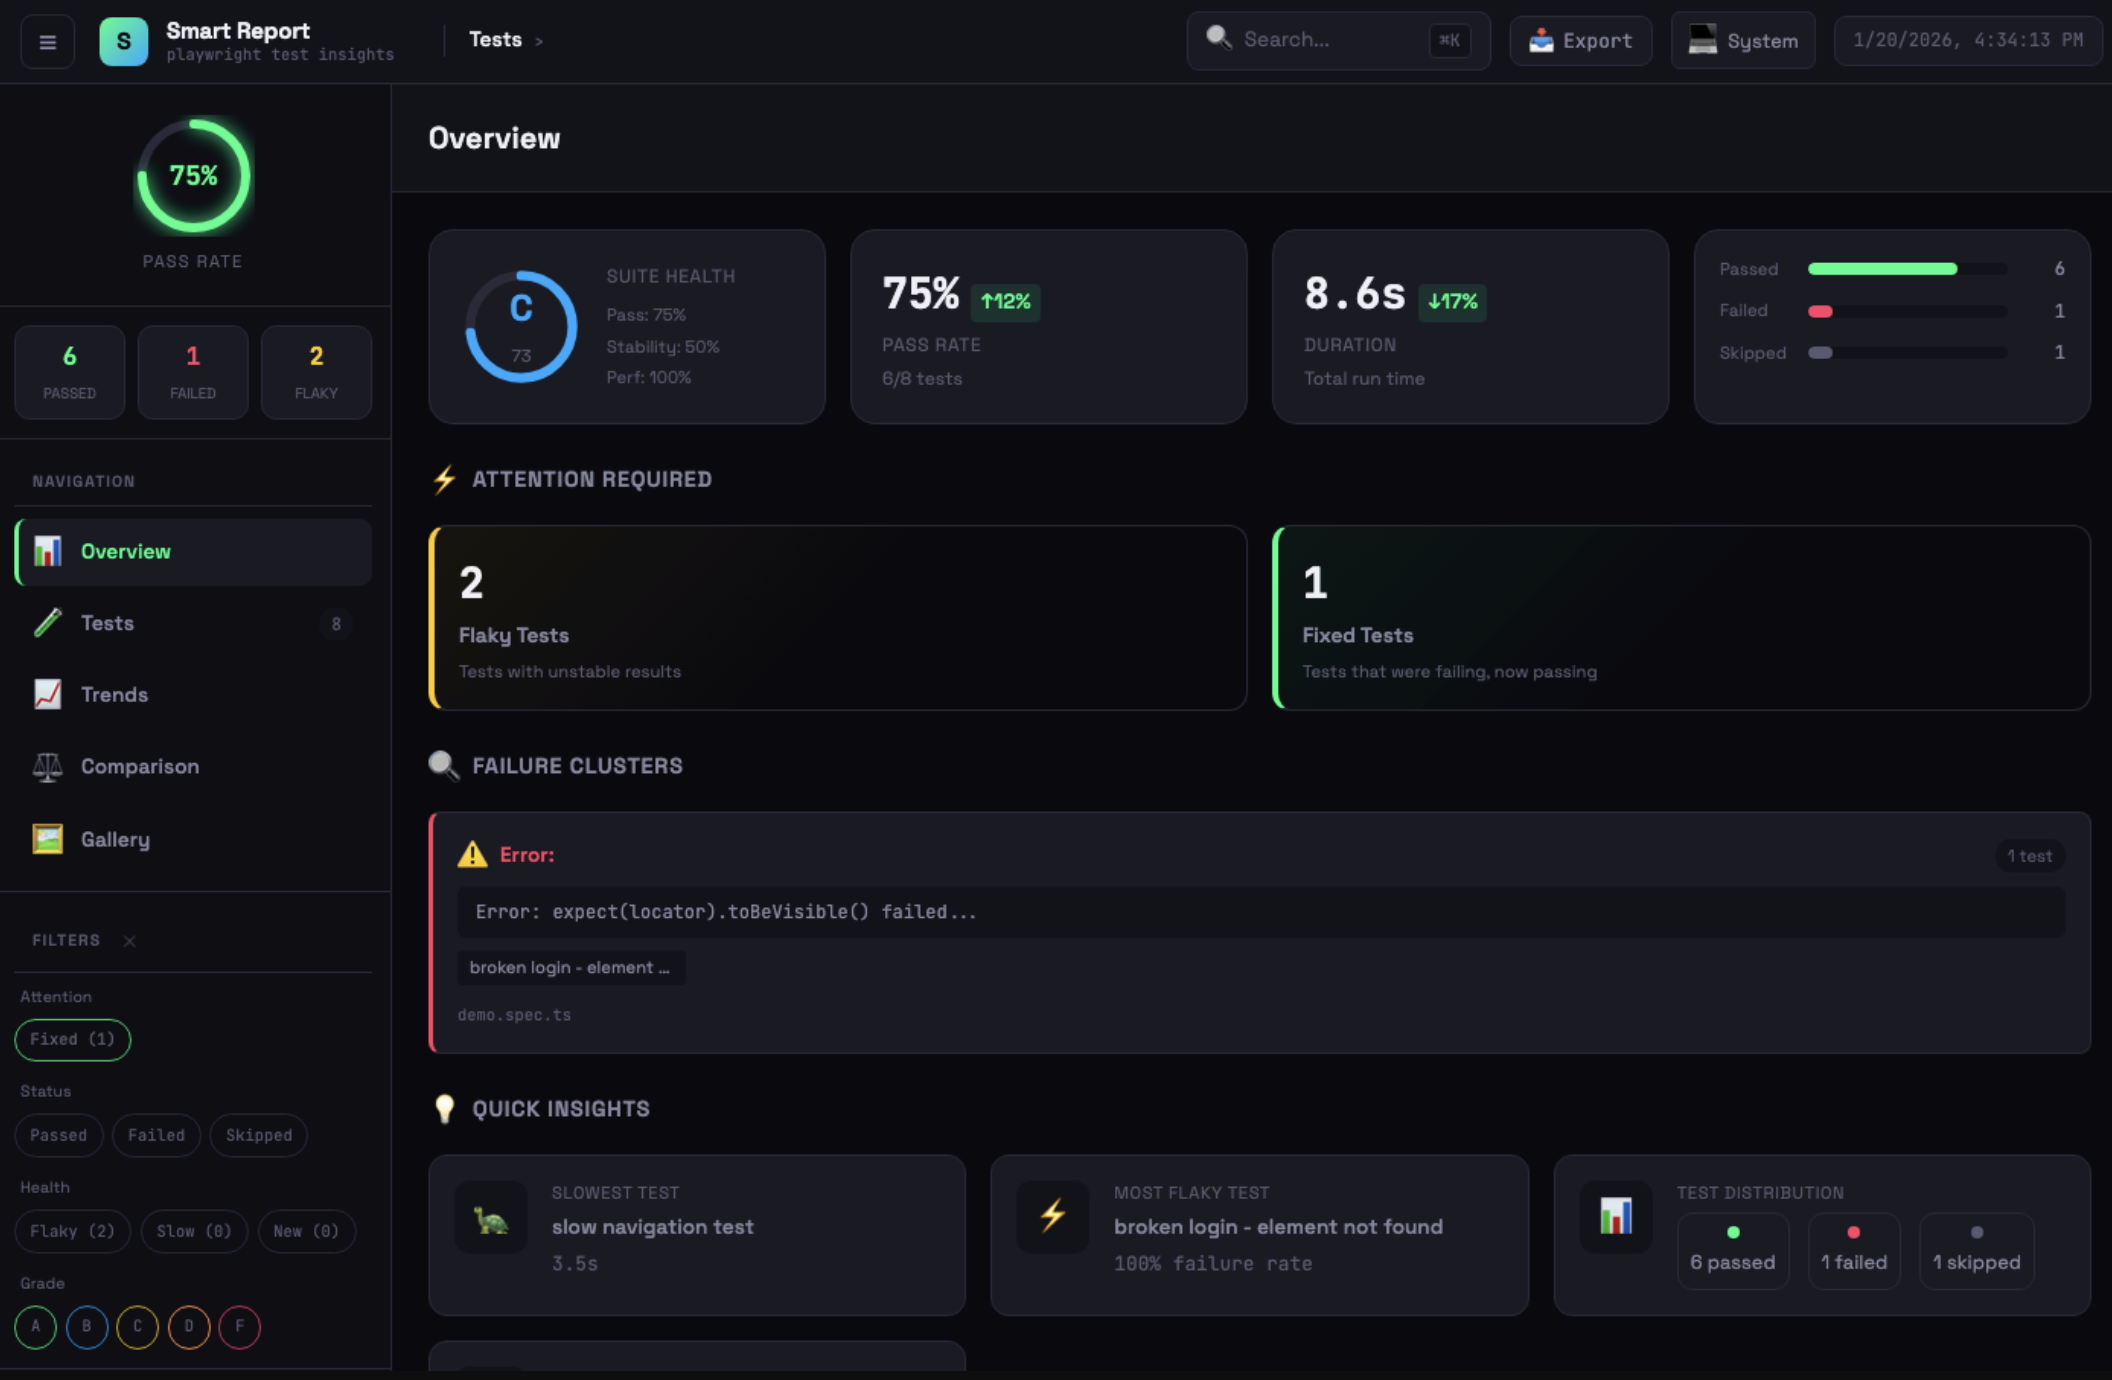
你应该能看到一个带有侧边栏、仪表盘、健康评分、失败聚类、趋势图的现代报告界面。
第三步:推荐的实用配置(日常推荐)
reporter: [
  ['playwright-smart-reporter', {
    // 核心输出
    outputFile: 'playwright-report/smart-report.html',
    historyFile: 'playwright-report/history.json',
    maxHistoryRuns: 15,

    // AI 失败分析(强烈推荐)
    enableAIRecommendations: true,

    // 稳定性 & 性能相关
    enableStabilityScore: true,
    enableRetryAnalysis: true,
    performanceThreshold: 0.25,           // 比历史平均慢25%报警
    enableFailureClustering: true,

    // 界面与体验
    filterPwApiSteps: true,               // 隐藏大量 page.click() 等底层步骤,只看 test.step()
    enableTraceViewer: true,
    enableNetworkLogs: true,
    enableGalleryView: true,

    // CI 友好
    runId: process.env.GITHUB_RUN_ID || process.env.CI_PIPELINE_ID || 'local',
    projectName: 'e2e-ui',                // 多项目时建议区分

    // 通知(可选)
    // slackWebhook: process.env.SLACK_WEBHOOK_URL,

    // 阈值微调(可选,根据团队实际情况调整)
    thresholds: {
      flakinessStable:   0.08,
      flakinessUnstable: 0.25,
      performanceRegression: 0.20,
      stabilityWeightFlakiness: 0.40,
      stabilityWeightPerformance: 0.30,
      stabilityWeightReliability: 0.30,
    },
  }],
],
第四步:开启 AI 失败分析(最有价值的功能之一)
设置以下任一环境变量(优先级:Claude > OpenAI > Gemini)
# 推荐 Claude(分析质量较好)
export ANTHROPIC_API_KEY=sk-ant-xxx...

# 或者 OpenAI
export OPENAI_API_KEY=sk-xxx...

# 或者 Google Gemini
export GEMINI_API_KEY=xxx...
重新跑测试 → 失败的case下方会出现 AI 给出的可能原因 + 修复建议(批量分析,适合大测试套件)。
第五步:CI 集成(让历史数据持续积累)
GitHub Actions 示例(最常见场景)
- name: Cache history file
  uses: actions/cache@v4
  with:
    path: playwright-report/history.json
    key: test-history-${{ github.ref }}
    restore-keys: test-history-

- name: Run Playwright tests
  run: npx playwright test --reporter=playwright-smart-reporter

- name: Save history cache (always)
  if: always()
  uses: actions/cache/save@v4
  with:
    path: playwright-report/history.json
    key: test-history-${{ github.ref }}-${{ github.run_id }}

- name: Upload smart report
  if: always()
  uses: actions/upload-artifact@v4
  with:
    name: smart-test-report
    path: playwright-report/smart-report.html
其他 CI(GitLab、CircleCI、Azure 等)也有类似缓存逻辑,详见官方文档 CI Integration 部分。
第六步:常用高级技巧速查
| 目标 | 配置项 / 命令 | 备注 |
|---|---|---|
| 隐藏底层 pw:api 步骤 | filterPwApiSteps: true | 报告更干净 |
| 只看最近10次历史的趋势 | maxHistoryRuns: 10 | 默认10 |
| 打开本地带 trace 的报告服务器 | npx playwright-smart-reporter-serve smart-report.html | 解决 file:// 跨域问题 |
| 合并分片运行的历史 | npx playwright-smart-reporter-merge-history ... | CI 分片后使用 |
| 严格 CSP 环境(公司内网常见) | cspSafe: true | 用文件引用而非 base64 |
| 查看单个 trace 文件 | npx playwright-smart-reporter-view-trace traces/xxx.zip | 调试用 |
| 性能回归报警阈值调低 | performanceThreshold: 0.15 | 更敏感 |
| 只关心 UI 项目历史 | projectName: "ui-tests" | 避免 api/ui 混在一起统计 |
常见问题快速定位
- 没有历史数据 / 趋势图为空 → 检查
historyFile是否正确,CI 是否缓存成功 - 没有 AI 建议 → 检查是否设置了 API Key,且失败用例存在
- 报告文件超大、浏览器卡 → 试试
cspSafe: true或减小maxHistoryRuns - flaky 判断跟官方不一样 → 正常,Smart Reporter 是基于多轮历史而非单次重试
- 网络请求没显示 → 确认
trace: 'retain-on-failure'或'on'已开启
总结 — 建议的起步路径
- 先用最简配置跑一次,感受现代仪表盘和健康评分
- 加上 AI Key,体验自动失败分析
- 把
history.json纳入 CI 缓存 → 几天后趋势图和 flaky 检测开始生效 - 根据团队痛点逐步打开 network logs、gallery、step timeline 等功能
Happy testing! 🚀