Playwright 使用技巧与诀窍 #4
· 1,771 词 · 9 分钟 读完 playwright进阶 翻译
继续我们的提示与技巧系列,在#1、#2和#3取得成功后,我们推出了最新的#4。希望你喜欢,并且别忘了阅读代码片段中的注释。
1. 如何拦截多个相同路由的请求?
我记得在 Cypress 中,这个功能非常容易实现,但在 Playwright 中,找到这种特定场景的细节却并不简单。想象一下,你在网页应用中导航,并希望验证多个具有相同路由的请求。比如,当你打开某个产品页面时,API 会在api/id/1发起请求以获取数据,然后你需要再次拦截同样的请求。如何拦截这两个请求?并且验证它们的数据?
你可以使用waitForRequest()来尝试,但还有一种更灵活的方法,这将为你打开更多的可能性。
import { test } from "@playwright/test";

test("验证多个相同路由的调用", async ({ page }) => {
  const requests: string[] = [];

  // 使用路由来区分你的网络调用
  await page.route("**/api/**", async (route) => {
    // 使用url().includes来过滤所需的确切调用
    if (route.request().url().includes("id/1")) {
      await route.continue();
      const response = await (await route.request().response())?.json();
      requests.push(response);
    } else {
      await route.continue();
    }
  });

  // 上面的代码像是一个你设置的监听器。将其放在触发网络调用之前

  await page.goto("www.yourapp.com");
  // 想象这一步触发了第一个id/1调用
  await product.click();
  // 这一步触发了第二个id/1调用
  await productExtraDetails.click();

  // 现在你等待它们并执行任何所需的断言
  await expect(async () => {
    expect(requests.length).toBe(2);
  }).toPass({
    intervals: [1_000, 2_000, 5_000],
    timeout: 15_000,
  });
});

// 下面是你需要的额外步骤
// 因为有时你的测试完成得比应用响应要快,你需要取消路由。
test.afterEach("取消所有路由", async ({ page }) => {
  await page.unrouteAll({ behavior: "wait" });
});
我见过这个场景的最常见用例是验证 trackers。
2. 在未断言元素数量之前不要使用.all()
假设你有一个选择器会返回多个元素,而你想遍历这些元素以断言某些值。如果你没有先断言数量,你的测试可能会出现假阳性。这就是原因。
如果你有 3 个元素,并执行以下代码:
import { test } from "@playwright/test";

test("在.all()上假阳性", async ({ page }) => {
  const expectedValues = ["a", "b", "c"];
  // 其他操作

  const allElements = await page.getByTestId(locator).all();

  for (const item of allElements) {
    await expect(item).toHaveAttribute("any-attribute", expectedValues);
  }
});
测试将如预期工作。然而,如果由于某种原因你的选择器在页面上找不到任何元素,测试将仍然通过。因为.all()在数量为零时不会报错,如果没有元素,forEach 将不会运行。
要正确处理此情况,你必须在遍历元素之前断言元素的数量。记得使用自动重试的toHaveCount,而不是像(allElements.length).toBe(3)这样的语句。
import { test, expect } from "@playwright/test";

test("正确使用.all()", async ({ page }) => {
  const expectedValues = ["a", "b", "c"];
  // 其他操作

  await expect(page.getByTestId(locator)).toHaveCount(5);
  const allElements = await page.getByTestId(locator).all();

  for (const item of allElements) {
    await expect(item).toHaveAttribute("any-attribute", expectedValues);
  }
});
即使是Playwright 官方文档也警告你关于.all()的使用,但现在你知道在未断言数量的情况下,这将不会正常工作。
专业提示:在 Playwright 的 async/await 风格中,不建议使用 forEach。你需要使用 for...of 来避免问题。
3. 点击之前无需断言可见性
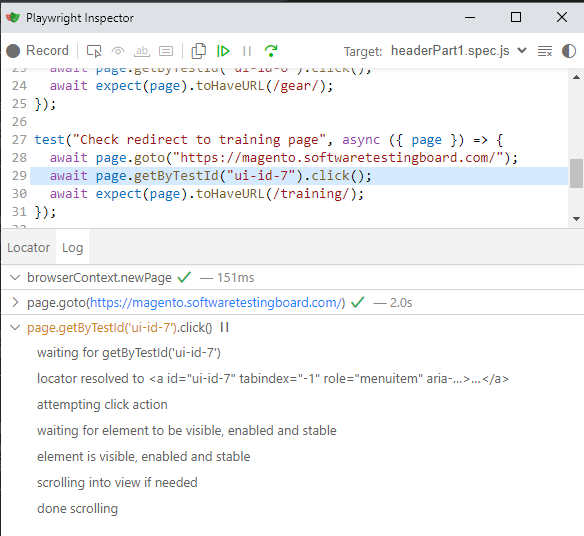
我觉得有必要提到这一点,因为我看到这种情况太频繁了。人们习惯在与元素交互之前断言其可见性,这是在任何教程或课堂上学到的行为,过去每个人都被迫学习的关键步骤。然而在 Playwright 中,有一种特定情况你不需要这样做。这种情况是对click()操作。以下是 Playwright 在点击元素之前所做的事情:

这些被称为可操作性检查,而且不仅限于click()。
一个关键点是,不要将其与 toHaveText 的断言混淆。当你使用最常见的断言方法之一toHaveText时要小心,因为 toHaveText 不会在元素可见之前等待。
4. 如何只运行我正在处理的测试?
对于大多数关注Playwright 发布说明的你来说,这可能已经很熟悉,但有些人可能不知道,你可以使用一个特殊的 CLI 命令,只运行那些已更改的测试。
想象一下你执行了git pull,然后创建自己的分支开始处理某些测试,但你修复了多个测试中的一些错误或甚至创建了新的多个测试。那么你可以这样运行测试:
npx playwright test path/to/test1.spec.ts path/to/test2.spec.ts path/to/test3.spec.ts path/to/test4.spec.ts path/to/test5.spec.ts path/to/test6.spec.ts path/to/test7.spec.ts
你可以简化为:
npx playwright test --only-changed=main
这将比较你的分支与主分支,并运行所有在你的分支中被修改的测试。
5. 如何在 Playwright 中验证表格数据?
假设你有一个表格,需要验证渲染的值。我不是在这里验证某个单元格中是否存在某个文本,而是要验证一个确切的值是否在特定的单元格中,该单元格对应确切的列和行。
你可以通过创建一个辅助函数来实现。为了方便你自己运行下面的代码并轻松测试,我将所有内容放在同一个文件中,当然,你可以根据自己的方式存储工具/辅助函数。
那么这个辅助方法是如何工作的呢?你给它三个参数,第一个是标题(列)的文本,第二个是你要验证的行,第三个是你希望在该单元格中看到的期望文本。
import { test, expect } from "@playwright/test";

class WebTableHelper {
  constructor(page) {
    this.page = page;
  }

  async validateCellValueReferenceToHeader(
    headerText,
    rowToValidate,
    expectedValue
  ) {
    const elementsOfHeader = await this.page
      .getByRole("table")
      .getByRole("row")
      .first()
      .getByRole("cell")
      .all();

    const elementsOfNRow = await this.page
      .getByRole("table")
      .getByRole("row")
      .nth(rowToValidate)
      .getByRole("cell")
      .all();

    for (let i = 0; i < elementsOfHeader.length; i++) {
      const headerValueFound = await elementsOfHeader[i].innerText();
      if (headerValueFound.toLowerCase() === headerText.trim().toLowerCase()) {
        const cellValue = await elementsOfNRow[i].innerText();
        expect(cellValue).toBe(expectedValue);
        return;
      }
    }
    throw new Error(`未找到文本为 "${headerText}" 的标题`);
  }
}

test("测试表格", async ({ page }) => {
  await page.goto("https://cosmocode.io/automation-practice-webtable");
  const helper = new WebTableHelper(page);
  await expect(page.getByRole("table").getByRole("row")).toHaveCount(197);
  await helper.validateCellValueReferenceToHeader("

Name", 3, "Ben");
});
你也可以像这样扩展它以验证更多的行,但你现在知道这段代码是如何运行的。
希望你喜欢这个小技巧和提示系列。每当你遇到复杂的场景或需要执行的特定操作时,记得看看 Playwright 的文档,因为它总是提供你需要的信息。也许你会找到一些你不知道的非常实用的功能。
关注我们的下一篇文章,看看我们会分享哪些内容!